Feeds:
Posts
Comments

Archive for the ‘Acrobat Tips & Tricks’ Category

For those of you who have already embraced Acrobat X, you have already noticed significant interface changes in the upgrade from Acrobat 9 to Acrobat X.  One of the first things you may have noticed is that there is a toolbar just to the right of the Create button, and it contains no identifying labels.  If you recall, Acrobat 9’s Tasks Toolbar had rather large buttons with labels showing by default.  Gone now are those interface giants, and now we have a simple and elegant Quick Tools toolbar.  QuAcrobat Quick Toolsick Tools are a collection of tools that you use often, and therefore would be handy within easy access at all times.  No one knows what your most often required tools are better than you, so you get to decide what tools will reside on this handy Quick Tools toolbar.  To customize your Acrobat Quick ToolsQuick Tools collection, click on the toolbar’s gear icon.  This brings up a dialog box in which you can move tools to and from the Quick Tools list.  Once you have a custom collection, you can rearrange them into the order that will work best for you.  If you ever find the need to reset your toolbars to the default installation configuration, either right-click on the tool bars are and select Reset Toolbars, or press Alt-F8 <Option F8 on Mac>.

Quick Tools are just one of the many awesome improvements that Adobe has incorporated into Acrobat X.  Want to learn more about Acrobat?  The Acrobat world is vast and growing constantly.  Don’t get left behind. To learn more about my Acrobat classes, send me an email to request training information and options.  If you want extraordinary PDF files instead of ordinary ones, why not drop me a note?
Read Full Post »

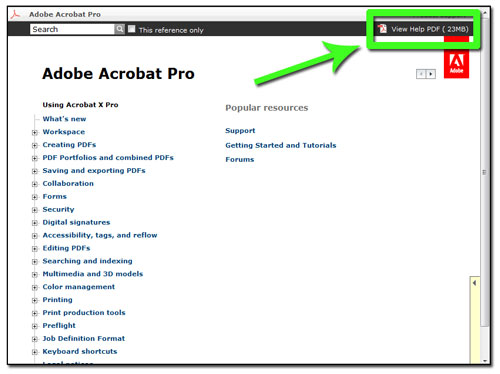
It’s one of the first things I teach in any Acrobat class.  The Acrobat Help System is available with a quick press of the F1 key.  It’s been that way for as long as I can remember.  Regardless of the version of Acrobat you are using, F1 has brought you to its Help file.  What varies from version to version is the type of file it presents, and therefore the program in which it opens.  acrobat x helpLater versions were HTML based documents, and opened up in your default browser.   In Acrobat 9, pressing F1 opened your browser and presented an HTML help file that was on your hard drive.  I was a little surprised to see what happened when I pressed F1 in the brand-new Acrobat X.  My browser opened and the Help file was offered for my use, but I quickly noticed that the browser’s address bar indicated that this was not a LOCAL file on my hard drive, but an HTML file located on Adobe’s server.  Is this a problem?  No… unless you’re at 36,000 over the Rocky Mountains in a 747 or inside the walls of a highly secure workspace.  There are times that the internet is just not accessible.  I found a neat way to make sure that acrobat x helpAcrobat’s Help file is at your fingertips at all times.  From a computer with Acrobat X installed (and internet access), press F1 from within Acrobat.  This will open the online Help file in your browser.  In the upper right of your browser window, look for a link that reads View Help PDF (23 MB) and click it.  This will load a PDF version of the Help file into your browser window, or you can right-click on the link and opt to save the file to your computer.  I have mine saved to my desktop, so it’s available and easy to find – even at 36,000 feet!

Since Acrobat X’s help file is online, you only need a url to see it – enjoy: http://help.adobe.com/en_US/acrobat/pro/using/index.html

Want to learn more about Acrobat?  The Acrobat world is vast and growing constantly.  Don’t get left behind. To learn more about my Acrobat classes, send me an email to request training information and options.  If you want extraordinary PDF files instead of ordinary ones, why not drop me a note?

Read Full Post »

Acrobat X Read ModeHopefully some of you have already acquired the latest and greatest release of Acrobat – Acrobat X.  Or perhaps you downloaded the free 30-day trial from Adobe by visiting this link.  Once Acrobat X is loaded, you were likely to run the program immediately to see how the user interface has changed.  And oh how it changed!  One immediately notices that Acrobat is less cluttered with menus and toolbars.  Rather than focusing on the many things that used to be there, I want to point out something that wasn’t there in earlier Acrobat versions, but has been added to the Acrobat X interface.  In the upper right portion of Acrobat X is a button.  It is a quick way to enter Acrobat X’s Read Mode.  Read Mode is not new to Acrobat.  In Acrobat 9, if you wanted to hide much of the interface to make for cleaner onscreen viewing, you could go to View>Reading Mode (ctrl H) to hide Acrobat X Read Modethe menus and toolbars.  I actually have used Reading Mode for years, and like the feature.  It has definitely kept me from wasting paper and toner, since Reading Mode really does make reading a PDF file onscreen easier.  Before Acrobat X, Reading Mode was a hidden gem that few ever uncovered, I believe.

With Acrobat X’s interface make-over Read Mode becomes a more easily found and more capable feature.  No, I’m not being sloppy.  Reading Mode was the name in Acrobat 9 and earlier, and now it is called Read Mode.  It may now have a shorter name, but definitely sports extended features.  Once you enter Read Mode, the menus and toolbars go away.  You now will see a great little navigation device fade in and out as you need it.  Document navigation, magnification – it’s there in Read Mode, but it’s not in your way, since it only appears onscreen when you move your mouse.  The same keyboard shortcut still works to toggle in and out of Read Mode – Ctrl-H.

Want to learn more about Acrobat?  The Acrobat world is vast and growing constantly.  Don’t get left behind. To learn more about my Acrobat classes, send me an email to request training information and options.  If you want extraordinary PDF files instead of ordinary ones, why not drop me a note?

Read Full Post »

Have you ever bought a new car, and couldn’t wait to drive it past your friend’s house?  You hoped to be seen in your new machine.  If they weren’t home, you made sure to swing by a few times throughout the day, just in case they returned home.  You were proud of your new wheels, and couldn’t wait to share it with the world!

Well, I am driving the new version of Acrobat today for the first time.  It’s called Acrobat X Professional, and I want you, and the whole world to see it too.  It’s sleek, fast, and extremely user-friendly.

Acrobat X features a streamlined user interface and commenting process, an Action Wizard to help you with complex tasks (or allow you to help others!) and a very clean Read Mode for ease of onscreen document reading.  The scanning process is improved, OCR accuracy is better, the Search functionality is beefier, and there is even built-in SharePoint Integration!  If you thought PDF Portfolios were cool in Acrobat 9, just you wait!  PDFMaker is now compatible with Office 2010 apps, and the export to Microsoft Word has to be seen to believe.

Acrobat X

Unlike the new car, that the protective owner would likely NOT allow you to test drive since it’s so new, you can take Acrobat X Pro for a spin for 30 days – absolutely free.  Click here to download Acrobat X and try it out for 30 days (Windows only).  Stay tuned for brand-new Acrobat X classes!  This is a major upgrade, with scores of improvements that will make your workflow easier, and your PDF files better. Don’t get left behind. To learn more about my Acrobat classes, send me an email to request training information and options.  If you want extraordinary PDF files instead of ordinary ones, why not drop me a note?

Read Full Post »

There are many ways to create PDF files, and many utilities used to accomplish this.  If you have Acrobat Professional running on your machine, you have probably discovered that the Acrobat’s installation process installed a print driver for you.  It’s called Adobe PDF, and can be used to create a PDF file from ANY application that has print capabilities.  Some of you may even use this feature exclusively.  Now suppose you are away from your computer, and you find yourself at someone else’s machine, or you have a PC that does NOT have Acrobat Professional installed.  You need to produce a PDF on the spot, but without your Adobe PDF print driver at hand, you’re stuck. .. or are you?

CreatePDFAdobe has added another terrific service to their cloud.  It’s called Adobe CreatePDF, and it offers some pretty amazing features.  This is not Adobe’s first online-PDF creation utility, but it certainly is the most flexible and capable.  It will allow you to convert many file types to PDF.  As useful as this is, it’s just the tip of the iceberg.  You can convert multiple documents into a single PDF file, and if you’re using Windows, you can download and CreatePDFinstall a special print driver that will allow you to create a PDF file online from any application that can print.  All this functionality is available for computers that do not have Acrobat Pro installed.  Amazing!

Is the service free?  No – well not exactly.  You can convert five files to PDF as a test drive, but the combining multiple files to a single PDF won’t be available to you unless you subscribe to the service. The cost to use this service with unlimited conversions is only $9.99 per month.  Visit https://createpdf.acrobat.com/welcome.html to give it a try or to subscribe to the service.  You can access the tools from your Acrobat.com account too.

I believe this is more than reasonable if you will be at various computers throughout your schedule, and Acrobat Pro is not always at hand.  Remember, you can log in to the service from ANY machine with web access and a browser!

The Acrobat world is vast and growing constantly.  Don’t get left behind. To learn more about my Acrobat classes, send me an email to request training information and options.  If you want extraordinary PDF files instead of ordinary ones, why not drop me a note?

Read Full Post »

I have written articles about Adobe’s ever-growing Cloud.  They started with Buzzword, added Presentations and Tables afterward.  Most of us are not tied to one computer, but rather use many throughout the day.  You have a PC (or two) at home, and you have one on your office desk.  You also have a smartphone on your belt at all times, and you probably use all of them regularly.  It just doesn’t make sense to have your valuable files sitting exclusively on one of them, since you might want or need to access one from another device.  This is why cloud computing is so valuable, and increasingly more necessary.

Adobe SendNow

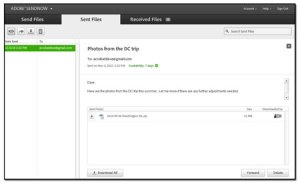
If you’ve ever tried to email someone a large file, you quickly learned that email attachments have a size limit, and it comes right back to you as undeliverable.  How then can I send a 15 megabyte file to a friend?  Use Adobe’s brand new cloud-based SendNow service!  If you already have an Acrobat.com account, you can log in using that and begin using this terrific service immediately.


Once logged in, you simply click the Select File button to browse for your file.  You type in your intended recipient, jot a note to accompany your file, and then press Send Now.  Your file is uploaded, a virus scan is performed, and that’s it!  An email is sent by the service to your intended recipient(s), and they can then download the file from the SendNow server.

Adobe SendNow

The SendNow service is multi-tiered, and pricing is very reasonable, considering that it offers a method of sending files (up to 2 Gigabytes in the Plus pricing, and 20 Gigabytes of online storage) from any machine TO any machine.  There’s a less expensive Basic plan, and heck – I’m using it for free to write this article and test it out!

Here’s where I get to tie it in perfectly with Acrobat itself.  In the almost-on-the-shelf release of Acrobat X, you can click the Share Panel & opt to send the file using Adobe SendNow.  The panel even gives you the opportunity to address it and enter a note right there.  Click the panel’s Send Link button, and it’s off to the SendNow service, along with an email to the recipient with a download link.  Easy, and awesome!

Want to learn more?  Much more?  To learn more about my Acrobat classes, send me an email to request training information and options.  If you want extraordinary PDF files instead of ordinary ones, why not drop me a note?

Read Full Post »

Acrobat will allow you to apply password security to a PDF file, therefore giving you control over who can open your file. There are times, however, that you may want to similarly control documents that are not PDF files.

Here’s an example: I have six files that I want to email to a coworker.  I don’t want just anyone to be able to open them, since they contain sensitive material.  One of them is a PDF file, but the other five are not.  A very slick solution would be to use Acrobat’s Security Envelope feature.  A Security Envelope is a PDF file (actually a PDF form) that has attached files.  Since the Security Envelope itself is a PDF file, one can easily apply security to it, and therefore protect the attachments, regardless of the file type.

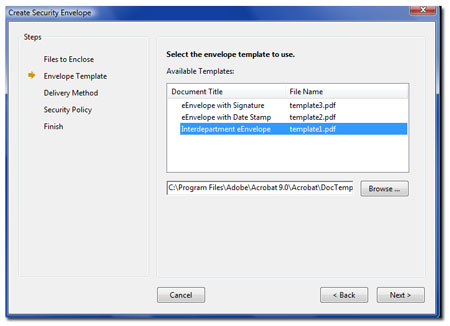
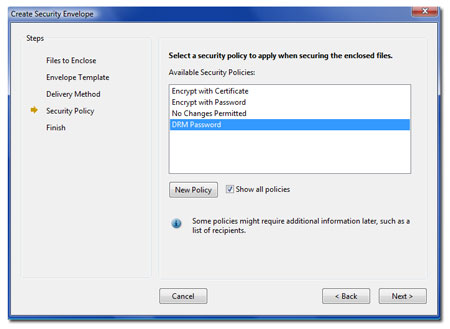
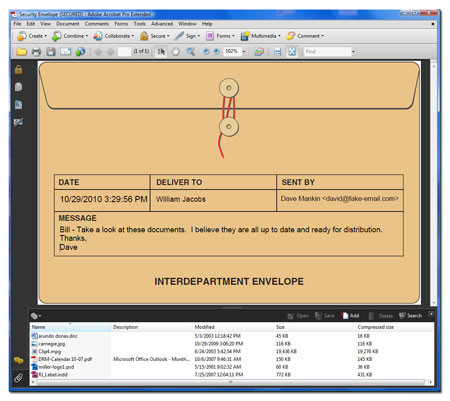
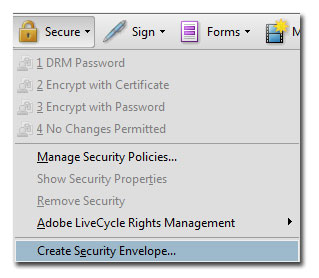
Acrobat Security EnvelopeTo initiate this process, click on the Secure Task Button and select Create Security Envelope.  Click the Add File to Send button to browse for your attachments.  You may do this process as many times as needed to find files in multiple locations.  Once you’ve collected your attachments, click Next.  You will then be given Acrobat Security Envelopethe opportunity to select your desired envelope template.  These are simply PDF forms, and you can create your own if you wish.  I chose Interdepartment eEnvelope for this demo.  I opted to send my Security Envelope later in the next screen.  The next screen will allow you to select a pre-defined Security Policy, or the opportunity to create one from scratch. (A Security Policy is a memorized security routine that can be applied and reused to PDF files quickly Acrobat Security Envelopeand efficiently). You can bypass security settings and apply them later, or not at all if you want.  You will finally end up with a single PDF file.  In this case, it truly resembles an interdepartmental envelope – complete with red string and fastening grommets!  There are form fields ready to be Acrobat Security Envelopefilled with appropriate information.  Once saved, the security is applied to the PDF file. The attachments are included inside the PDF, and covered by its security settings.  If a user can not open the PDF file (he/she does not have the open password, for example), they cannot get to the attachments.

Acrobat Security Envelope

A very cool feature that many folks have never seen!  Want to learn more?  Much more?  To learn more about my Acrobat classes, send me an email to request training information and options.  If you want extraordinary PDF files instead of ordinary ones, why not drop me a note?

Read Full Post »

Many Acrobat users also use some of Adobe’s other amazing products.  I use, for example, Photoshop and Acrobat nearly every day.  One of the nice features of Photoshop that I have grown to rely on is the Navigator.  Photoshop’s Navigator is basically a miniature window of the currently active file. One can move around to different regions of the page, and change magnification – all without having to switch over to the Zoom tool or Hand tool.  Not many people, however, realize that a similar tool exists in Acrobat, which allows the user to move around the current PDF page, and even change magnification – all without changing tools.

Acrobat's pan and zoom iconHere’s how to find this feature in Acrobat: to begin with, it has a different name than Photoshop’s Navigator.  In Acrobat, this tool is called the Pan & Zoom tool.  It lives on the Select & Zoom toolbar, but it is not part of that toolbar’s default set.  You’ll need to uncover Acrobat's pan_zoomit by right-clicking on the Select & Zoom toolbar and clicking on Pan & Zoom Window.  At this point, the tool’s icon will be visible on the toolbar, and you can activate it by clicking the icon.  A floating window now opens, revealing a miniature view of your current page.  This window is movable and scalable.  You’ll see a red rectangle that exactly mirrors the region of the page that is in view.  Drag that rectangle, and you adjust your view panel to show the new location.  Squeeze that red box by a corner by clicking & dragging, and you will readjust your magnification.  If that red rectangle isn’t easy to see due to your page’s color scheme, you can change the highlight color as well.  You can even navigate from page to page by using the Pan & Zoom’s own navigation buttons!

Another Acrobat hidden gem!  Want to learn more?  Sign up for an Acrobat class today.  I offer training classes in Adobe Acrobat 9, either in your facility or online.  To learn more about my Acrobat classes, send me an email to request training information and options.  If you want extraordinary PDF files instead of ordinary ones, why not drop me a note?

Read Full Post »

update acrobatSome things in life just get better with time.  As a regular Acrobat user since version 2, I can tell you with great confidence that Acrobat 9 is better than Acrobat 8, which was better than Acrobat 7, etc.  Improvements and tweaks (and repair patches) are a constant component of the software industry.  Adobe clearly doesn’t sit back and take their eyes off the ball once its software is released.  Improvements and tweaks are made constantly and can be obtained through Acrobat’s (and Reader’s) built-in Updater.  To find out if your installation is current, simply click on Help>Check For Updates.  If updates are available, you will be prompted to have the updates downloaded and installed.

Earlier this week, Adobe released an update which updates Reader & Acrobat to version 9.4.  Most importantly, it addresses a critical vulnerability.  Here are Adobe’s words regarding this:

This vulnerability (CVE-2010-2883) could cause a crash and potentially allow an attacker to take control of the affected system. There are reports that this vulnerability is being actively exploited in the wild.

This should be enough of a reason to check if you have this update installed. If you have your Updater preferences set to download and install updates automatically, you may already be current (Edit>Preferences>Updater on PC, or Acrobat>Preferences>Updater on Mac to see your Updater settings).  If your Updater informs you that updates are available, don’t hesitate.  The thought of someone in another hemisphere taking my hard drive and data out for a remote test drive is rather unsettling.

You can read Adobe’s Release Notes on version 9.4 notes by clicking here.  Happy patching, folks.  Let’s do our own test driving.

Acrobat is loaded with amazing and useful features.  Want to learn more?  Sign up for an Acrobat class today.  I offer training classes in Adobe Acrobat 9, either in your facility or online.  To learn more about my Acrobat classes, send me an email to request training information and options.  If you want extraordinary PDF files instead of ordinary ones, why not drop me a note?
Read Full Post »

PDF files, by their very nature, are a sophisticated and highly flexible and capable file format.  I have been asked by dozens of clients and students over the years to show them how to export a PDF to a Microsoft Word document.  In the early days of Acrobat, it wasn’t necessarily the simplest thing to do.  In Acrobat 8’s interface, we had a large and rather obvious Export Task Button. In Acrobat 9, the task button is gone, but the Export command still lives under the File menu.

A Word document exported from a PDF file is usually a rough sketch, in my experiences.  I have logged many, many hours reworking these files into usable documents.  Sometimes the cleanup export from pdfwork seems nearly insurmountable.  In these cases, I will then ask Acrobat to create a plain-old text file, essentially a document without any real formatting.  To do this, I click File>Export>Text>Text (Plain) for the most fundamentally unformatted document.  I will then open this text file in Microsoft Word, and finally apply proper formatting.

The Export command has lots of file formats to explore.  You can export a PDF file as a Word document, RTF, XML, HTML, various image formats, Postscript (EPS too), PDF/A, PDF/X and PDF/E.  If you need to export multiple files, there’s an option to do that in one task versus opening each file individually.

export from pdf

Acrobat is loaded with surprises.  Want to learn more?  Sign up for an Acrobat class today.  I offer training classes in Adobe Acrobat 9, either in your facility or online.  To learn more about my Acrobat classes, send me an email to request training information and options.  If you want extraordinary PDF files instead of ordinary ones, why not drop me a note?
Read Full Post »

Older Posts »